Best Practices for Creating a Modern npm Package with Security in Mind

February 4, 2025
0 mins readTechnology is always changing and your processes and practices need to keep up with those changes. So while npm is 15 years old (as of 2025), your practices around npm package creation should hopefully be a lot more modern. If you have a feeling they may be a little out of date, though, keep reading.
In this tutorial, we’re going to walk step by step through creating an npm package using modern best practices (as of 2025). You will first learn how to create an npm package, so you can get familiar with building and publishing a package to the npm registry. Then you’ll learn what’s involved with making a more robust and production-ready npm package by setting up a test framework, a continuous integration and deployment pipeline, security checks and automated semantic version management for release. By the end of this tutorial you’ll feel confident in your ability to produce modern and sustainable npm packages. Let’s get started!
Prerequisites
1. Familiarity with Node.js, JavaScript/TypeScript, GitHub, and GitHub Actions
2. Development tools available to assist with creating an npm package
Simple example npm package
Let’s first get acquainted with the process around creating and publishing an npm package by using a simple example. If you’re already familiar with this you can jump ahead to the Production-ready npm package section which covers more advanced topics.
Set up your project
You’ll need a project in GitHub to get started, so follow these steps to initiate a project. If you already have one to use, you can skip to the next section, but be sure to double check step 5 in this section regarding your package name.
Create a GitHub repository: https://github.com/new
Clone the repo locally.
Example:git clonehttps://github.com/snyk-snippets/simple-npm-package.gitOpen your terminal and change directories to the folder of your cloned project.
Example:cd simple-npm-packageRun
npm init -yto create apackage.jsonfile. Note: If you cloned the example repository, you won't need to do this step.Update the
nameproperty inpackage.jsonwith a scoped name.
Example:@clarkio/simple-npm-package. Be sure to use your username or organization name instead of@clarkio.Write your code for the package (or just use the hello world example in index.js).
Once your project is created, you can move on to creating an npm account.
Set up an npm account
In order to be able to make your npm package available for others to use, you’ll need an npm account. The following steps will walk you through creating your own account (if you don’t have one already), enabling two-factor authentication (2FA) to improve the security of your account, and connecting your account to your local machine.
1. Sign up with npm at https://www.npmjs.com/signup.
2. For better security, enable 2FA on your npm account: https://docs.npmjs.com/configuring-two-factor-authentication.
3. Sign in with your npm account in your terminal using the command npm login and follow the on-screen instructions. For example:
1> npm login
2npm notice Log in on https://registry.npmjs.org/
3Username: clarkio
4Password:
5Email: (this IS public) <email address>
6npm notice Please use the one-time password (OTP) from your authenticator application
7Enter one-time password from our authenticator app: <OTP>
8Logged in as clarkio on https://registry.npmjs.org/.
How to publish your npm package
Once you have an npm project and an npm account, you’re ready to publish your npm package to the public and official npmjs registry to make it available for others to consume. Here are the steps for you to follow to check what will be published before executing that and then running the actual publish process:
In your terminal, run
npx pack --dry-runto see the contents that will be included in the published version of the package.
1> npx pack --dry-run
2npm notice Tarball Contents
3npm notice 1.1kB LICENSE
4npm notice 1.9kB README.md
5npm notice 108B index.js
6npm notice 700B package.json
7npm notice Tarball Details
This ensures you are not missing any source code files that are needed for your package to function properly. It’s also a good practice to make sure you aren’t accidentally leaking sensitive information to the public such as a local configuration file with database credentials or API keys.
2. In your terminal, run npm publish --dry-run to see what would be done when actually running the command.
1> npm publish --dry-run
2npm notice
3npm notice 📦@clarkio/simple-npm-package@0.0.1
4npm notice === Tarball Contents ===
5npm notice 1.1kB LICENSE
6npm notice 1.2kB README.md
7npm notice 95B index.js
8npm notice 690B package.json
9npm notice === Tarball Details===
10npm notice name: @clarkio/simple-npm-package
11npm notice version: 0.0.1
12npm notice filename:@clarkio/simple-npm-package-0.0.1.tgz
13npm notice package size:1.7 kB
14npm notice unpacked size: 3.1 kB
15npm notice shasum:40ede3ed630fa8857c0c9b8d4c81664374aa811c
16npm notice integrity:sha512-QZCyWZTspkcUXL... ]L60ZKBOOBRLTg==
17npm notice total files:4
18npm notice
19+ @clarkio/simple-npm-package@0.0.1
3. In your terminal, run npm publish --access=public to actually publish the package to npm. Note: --access=public is needed for scoped packages (@clarkio/modern-npm-package) as they're private by default. If it's not scoped and doesn't have the private field set to true in your package.json, it will be public as well.
1> npm publish --access=public
2npm notice
3npm notice 📦@clarkio/simple-npm-package@0.0.1
4npm notice === Tarball Contents ===
5npm notice 1.1kB LICENSE
6npm notice 1.2kB README.md
7npm notice 95B index.js
8npm notice 690B package.json
9npm notice === Tarball Details===
10npm notice name: @clarkio/simple-npm-package
11npm notice version: 0.0.1
12npm notice filename:@clarkio/simple-npm-package-0.0.1.tgz
13npm notice package size:2.1 kB
14npm notice unpacked size: 4.1 kB
15npm notice shasum:6f335d6254ebb77a5a24ee729650052a69994594
16npm notice integrity:sha512-VZ1K1eMFOKeJW[...]7ZjKFVAxLcpdQ==
17npm notice total files:4
18npm notice
19This operation requires a one-time password.
20Enter OTP: <OTP>
21+ @clarkio/simple-npm-package@0.0.1
You’re done! You’ve completed building and deploying your own npm package. Next up, you’ll learn how to make a more robust package that is ready for production environments and to be used more widely.
Production-ready npm package
While the previous example package could potentially be used in production, it involves manual work to keep up with its maintenance over time. Using tools and automation along with proper testing and security checks will help minimize the total effort to keep the package running smoothly. Let’s dive deeper to see what that involves.
The following sections will cover:
1. Set up your modern-npm-package project
2. Building for ECMAScript (ESM) module format
3. Setting up and writing unit tests
4. Implementing security checks
5. Automating version management and publishing
If you don’t have your own project to use while following along with this article, you can use the following example project as a reference: https://github.com/snyk-snippets/modern-npm-package.
Building for ECMAScript Module Format
ECMAScript Module format is now natively supported in Node.js as of version 12+, and the latest Long-term Support version is 22.x. Also the JavaScript runtime space has some more competition with the likes of Bun.js and Deno - all of which make it easy to focus on using the ESM format now. We’ll use TypeScript to prepare your npm package to use the ESM format.
First, create a TypeScript configuration file with the name
tsconfig.json. This is for compilation settings that can be used when building your package using ESM. Feel free to adjust this as needed for your project and in particular you’ll want to adjust thefilesproperty to align with your project structure if you’re not using the example one provided.
1{
2    "compilerOptions": {
3      "lib": ["ES2024", "DOM"],
4      "target": "ES2024",
5      "module": "NodeNext",
6      "moduleResolution": "NodeNext",
7      "outDir": "./lib/",
8      "declarationDir": "./lib/types",
9      "strict": true,
10      "esModuleInterop": true,
11      "forceConsistentCasingInFileNames": true,
12      "skipLibCheck": true,
13      "checkJs": true,
14      "allowJs": true,
15      "declaration": true,
16      "declarationMap": true,
17      "allowSyntheticDefaultImports": true
18    },
19    "files": ["./src/index.ts"]
20  }
The
libproperty indicates to TypeScript what types it should reference to assist you while writing code for your project.The
targetproperty indicates to TypeScript which JavaScript version to compile your project code.The
moduleproperty indicates to TypeScript which JavaScript module format should be used when compiling your project code.The
moduleResolutionproperty helps TypeScript to figure out how an “import” statement should be referred to.The
outDiranddeclarationDirproperties indicate to TypeScript where to place the results from compiling your code and defining the types used within it.
2. Update your package.json file with a files field that points to your lib folder holding the results from TypeScript building the package for you.
3. Update your package.json file main and types fields to point to the output of the built/compiled package. This is to act as a default, fallback, option.
1"types": "./lib/index.d.ts",
2  "main": "./lib/index.js",
4. Add a files field to your package.json file to indicate which files should be included when npm packages up your code for publishing.
1"files": [
2   "lib/**/*"
3],
5. Create commands via the scripts field in package.json to use tsc and compile the package. This will result in generating the source files for the lib folder.
1    "clean": "del-cli ./lib",
2    "build": "npm run clean && tsc -p ./tsconfig.json",
3    "prepack": "npm run build",
The
cleanscript is used to delete the output from past builds and start from a clean slate.The
buildscript cleans any past output files and uses the TypeScript compiler to build the package to the output directory.The
prepackscript is used by npm before packing the npm package in preparation for publishing to a registry.
6. Now you need to install the necessary developer dependencies for this all to work. Run npm install -D typescript del-cli
7. Now you can run npm run build in your terminal to have TypeScript build your project in preparation for use and publishing
That’s all the setup you need to do to use TypeScript for building your npm package that supports the CommonJS and ECMAScript module format. Next, you’ll learn how to set up and run tests against your npm package code to ensure it produces the results you expect.
Setting up and adding tests
In order to have confidence in the behavior and results of your code, you will need to implement a testing process. Tests force you to think about the functionality of your code in different ways outside of the typical, happy, path when first creating it. As an example you can think of ways to break a function to cause it to throw an error or produce a result that’s not intended. Doing this will make your application more resilient and sustainable as well as ensure nothing breaks when adding more to it.
If you’d like to dive deeper into testing and learn about the best practices for it, be sure to read through Yoni Goldberg’s JavaScript Best Practices repository.
Unit testing
Making sure your package behaves in the way you want it to involves writing tests against your code. You’ll need a few tools to help with setting up your project to run unit tests and show the results. These tools are now available as built-in modules in Node.js (since version 20.x and 18.x and 16.17.x behind an experimental flag). Follow the steps below to set up and run tests for your npm package:
Install developer dependencies using the following command in your terminal:
npm i -D @types/nodeCreate a
testsfolder in the root directory of your project.Create an
index.test.tsfile in thetestsfolder.Write unit tests in the
index.test.tsfile to test the code inindex.ts
Note: you can refer to the example npm package repository as an example: https://github.com/snyk-snippets/modern-npm-package.
5. Add a tests property in the scripts section of your package.json file and give it a value of node --experimental-strip-types --test
1  "scripts": {
2     "clean": "del-cli ./lib",
3    "build": "npm run clean && tsc -p ./tsconfig.json",
4    "prepack": "npm run build",
5    "test": "node --experimental-strip-types --test",
6
7  },
6. Run npm test in your terminal from the root folder of the project to execute your tests and see the results:
1> @snyk-labs/modern-npm-package@0.0.0-development test
2> node --experimental-strip-types --test
3
4(node:83429) ExperimentalWarning: Type Stripping is an experimental feature and might change at any time
5(Use `node --trace-warnings ...` to show where the warning was created)
6(node:83430) ExperimentalWarning: Type Stripping is an experimental feature and might change at any time
7(Use `node --trace-warnings ...` to show where the warning was created)
8▶ NPM Package
9  ✔ should be an object (0.754083ms)
10  ✔ should have a helloWorld property (0.518958ms)
11✔ NPM Package (1.754875ms)
12▶ Hello World Function
13  ✔ should be a function (0.136667ms)
14  ✔ should return the hello world message (0.063791ms)
15✔ Hello World Function (0.270417ms)
16▶ Goodbye Function
17  ✔ should be a function (0.13275ms)
18  ✔ should return the goodbye message (0.159541ms)
19✔ Goodbye Function (0.552542ms)
20ℹ tests 6
21ℹ suites 3
22ℹ pass 6
23ℹ fail 0
24ℹ cancelled 0
25ℹ skipped 0
26ℹ todo 0
27ℹ duration_ms 113.692542
Testing in a pipeline
Now that you have tests to validate the behavior of your code you can use them in a pipeline. This will help to make sure no changes introduced into your repository will break your code behavior. Follow the steps below to create a test workflow as part of your project pipeline.
Create a new GitHub Action for your repository:
https://github.com/<your-account-or-organization>/<your-repo-name>/actions/newRename the workflow to
tests.ymlInsert the following Snyk GitHub Action script in your workflow file:
1name: Tests
2
3on:
4  push:
5    branches: [ main ]
6  pull_request:
7    branches: [ main ]
8
9jobs:
10  build:
11
12    runs-on: ubuntu-latest
13
14    strategy:
15      matrix:
16        node-version: [22.x]
17
18    steps:
19      - uses: actions/checkout@v4
20      - name: Use Node.js ${{ matrix.node-version }}
21        uses: actions/setup-node@v4
22        with:
23          node-version: ${{ matrix.node-version }}
24      - run: npm ci
25      - run: npm test
This YAML script checks out your latest code, installs its dependencies, and runs the npm test command to execute your tests. It does this for every version of Node.js listed in the node-version field so you can ensure the code works as expected in each runtime.
You’ve now finished setting up your project for running and evaluating tests against the code of your npm package. However, you may be thinking “how do I test using my npm package in another project?” Let’s see how you can go about accomplishing that next.
Package testing
It’s one thing to have confidence in the code of your npm package through unit tests, but it’s another thing to ensure the experience in using the overall npm package. This involves pulling in your npm package as a dependency into another project and seeing if its use there goes as smoothly as you expect it to. Here are five ways you can test this:
Install via
npm packoutputInstall via relative path
Install via
npm linkInstall via registry (such as the npm public registry at npmjs.com)
Use Verdaccio (an open source npm private npm registry project) to run end-to-end package publishing and install steps as part of your CI
npm pack
This approach will leverage the npm pack command to package up and zip your npm package into a single file (<package-name>.tgz). You can then go to the project you want to use the package in and install it via this file. The steps to do this are as follows:
From within your npm package directory, run
npm packin your terminal. Note the .tgz file it produces and the location of it.Change directories to the project directory where you want to use the npm package. Example:
cd /path/to/projectFrom within the client project directory, run
npm install /path/to/package.tgzbut replace it with the proper path to the location of the .tgz file from step 1Then you can start using the package in that client project to test things out
This will give you the closest to production experience for using your npm package.
npm link
This approach will leverage the npm link command to point to your package directory when attempting to install it in client projects. The steps to do this are as follows:
From within your npm package directory run
npm linkin your terminalChange directories to the project directory where you want to use the npm package. Example:
cd /path/to/projectFrom within the client project directory run
npm link <name-of-your-package>
This will point your client project to the npm package directory when referencing the package for use in your code. This doesn’t give you a full production-like experience for the use of your package, but does allow you to ensure the functionality works as expected.
Relative path
This approach leverages your existing knowledge of using the npm install command. It’s similar to npm link without having to know a new command like link.
From within your client project directory run
npm install /path/to/your/packagein your terminal.
Similar to the npm link approach, this will allow you to quickly test the functionality of your package within a client project but will not give you the full production-like experience. This is because it points to the full package source code directory and not a built version of the package that you’d find in an npm registry.
npm registry
This approach leverages using the public (or your own) registry for npm packages. It involves publishing your package and installing as you typically would for any other npm package.
Publish your npm package using the steps outlined earlier in this article via the
npm publishcommandChange directories to the project directory where you want to use the npm package. Example:
cd /path/to/projectFrom within the client project directory run
npm install <name-of-your-package>
Shout out to Mirco Kraenz (@MKraenz) who created a Twitter thread summarizing our learnings of this during a livestream!
At this point, you’ve now built your package to support modern module formats and ensured it’s behaving as expected through unit tests and packaging tests. Next, you’ll need to make sure there aren’t any security issues and prevent new ones from being introduced in your npm package.
Implementing security checks
In the same way you don’t want security vulnerabilities in your own projects, you also don’t want to introduce vulnerabilities into anyone else’s project. Building an npm package expected to be used within many other projects presents an increased level of responsibility to ensure things are secure. You need to have security checks in place to help monitor for, alert on, and offer assistance to mitigate vulnerabilities. This is where a tool like Snyk can simplify the work needed to accomplish these needs.
For this example npm package, you’re using GitHub as your source control management tool so you’ll leverage its GitHub Actions feature to integrate Snyk in your workflow. Snyk has a GitHub Actions reference project that helps jump start the work for this and offers examples for other programming languages and tools you might be using for your projects.
1. Snyk is free, so sign-up and get your Snyk API Token.
2. Add your Snyk API Token as a Repository Secret on GitHub: https://github.com/<your-account-or-organization>/<your-repo-name>/settings/secrets/actions/new
3. Create a new GitHub Action for your repository: https://github.com/<your-account-or-organization>/<your-repo-name>/actions/new
4. Rename the workflow to snyk.yml.
5. Insert the following Snyk Action script in your workflow file:
1name: Snyk Security Check
2on: [push,pull_request]
3jobs:
4  security:
5    runs-on: ubuntu-latest
6    steps:
7      - uses: actions/checkout@main
8      - name: Run Snyk to check for vulnerabilities
9        uses: snyk/actions/node@master
10        env:
11          SNYK_TOKEN: ${{ secrets.SNYK_TOKEN }}
6. Commit your changes.
7. Validate the Action ran successfully: https://github.com/<your-account-or-organization>/<your-repo-name>/actions
With this now set up, anytime anyone pushes to your repository or opens a pull request against it, a security check will run to ensure it’s not introducing any vulnerabilities into the package. If it does find an issue, the Action will fail and alert you with the details of the security issue found. Next up you’ll automate the process around versioning and publishing your npm package.
Do you want to know about security issues before changes are pushed to your repository? Install the Snyk plugin for your development tool of choice. Do you prefer to use CLI tools? Add the Snyk CLI to your toolchain as well. These will help detect security issues while you’re developing and alert you about them earlier in your project workflow.
One thing to note about this current setup is that it’s only leveraging the Snyk Open Source (SCA) product and not Snyk Code (SAST). Snyk Code is our code security product, and you’ll need to enable it (for free) via your Snyk account first and then add into your workflow script here to take full advantage of it. To learn more about using Snyk Code in your pipeline read this article on Building a Secure Pipeline with GitHub Actions (it uses Java and Maven, but can be replaced with Node.js and npm).
Automating version management and publishing
Whenever you merge changes in your main branch, you don’t want to manually update the version of the npm package and publish it every time. Instead, you’ll want to automate this process to happen for you. If you recall from the simple npm package example earlier in this post, you used the following command to publish your npm package:
1npm publishYou also want to follow the industry standard of semantic versioning so that consumers of your package understand what implications come with the different version changes you publish to the registry.
What is semantic versioning?
Semantic versioning prescribes that the version be numbered with three placeholders. The first being the major version, second being the minor version, and last being the patch version. To learn more about semantic versioning, version management and lockfiles read What is Package Lock JSON and How a Lockfile Works with Yarn and NPM packages
What if you could skip doing all that manually and instead set up an automated workflow with GitHub Actions that handles npm package publishing for you? You’re in luck because there’s a tool available called Semantic Release which integrates with GitHub Actions. The key to help automate this process is that you use what’s called conventional commits while committing changes to your project. This enables the automation to update everything accordingly and know how to prepare the next release of your project for you.
The following steps will walk you through setting this up for your modern npm package.
1. In your terminal, run: npm i -D semantic-release
2. In your terminal, run: npx semantic-release-cli setup
3. Follow the terminal prompts and provide the needed tokens:
You’ll need a personal access token from GitHub. To create one go to
https://github.com/settings/tokens/new?scopes=public_repoWhile creating this token use the following scopes:
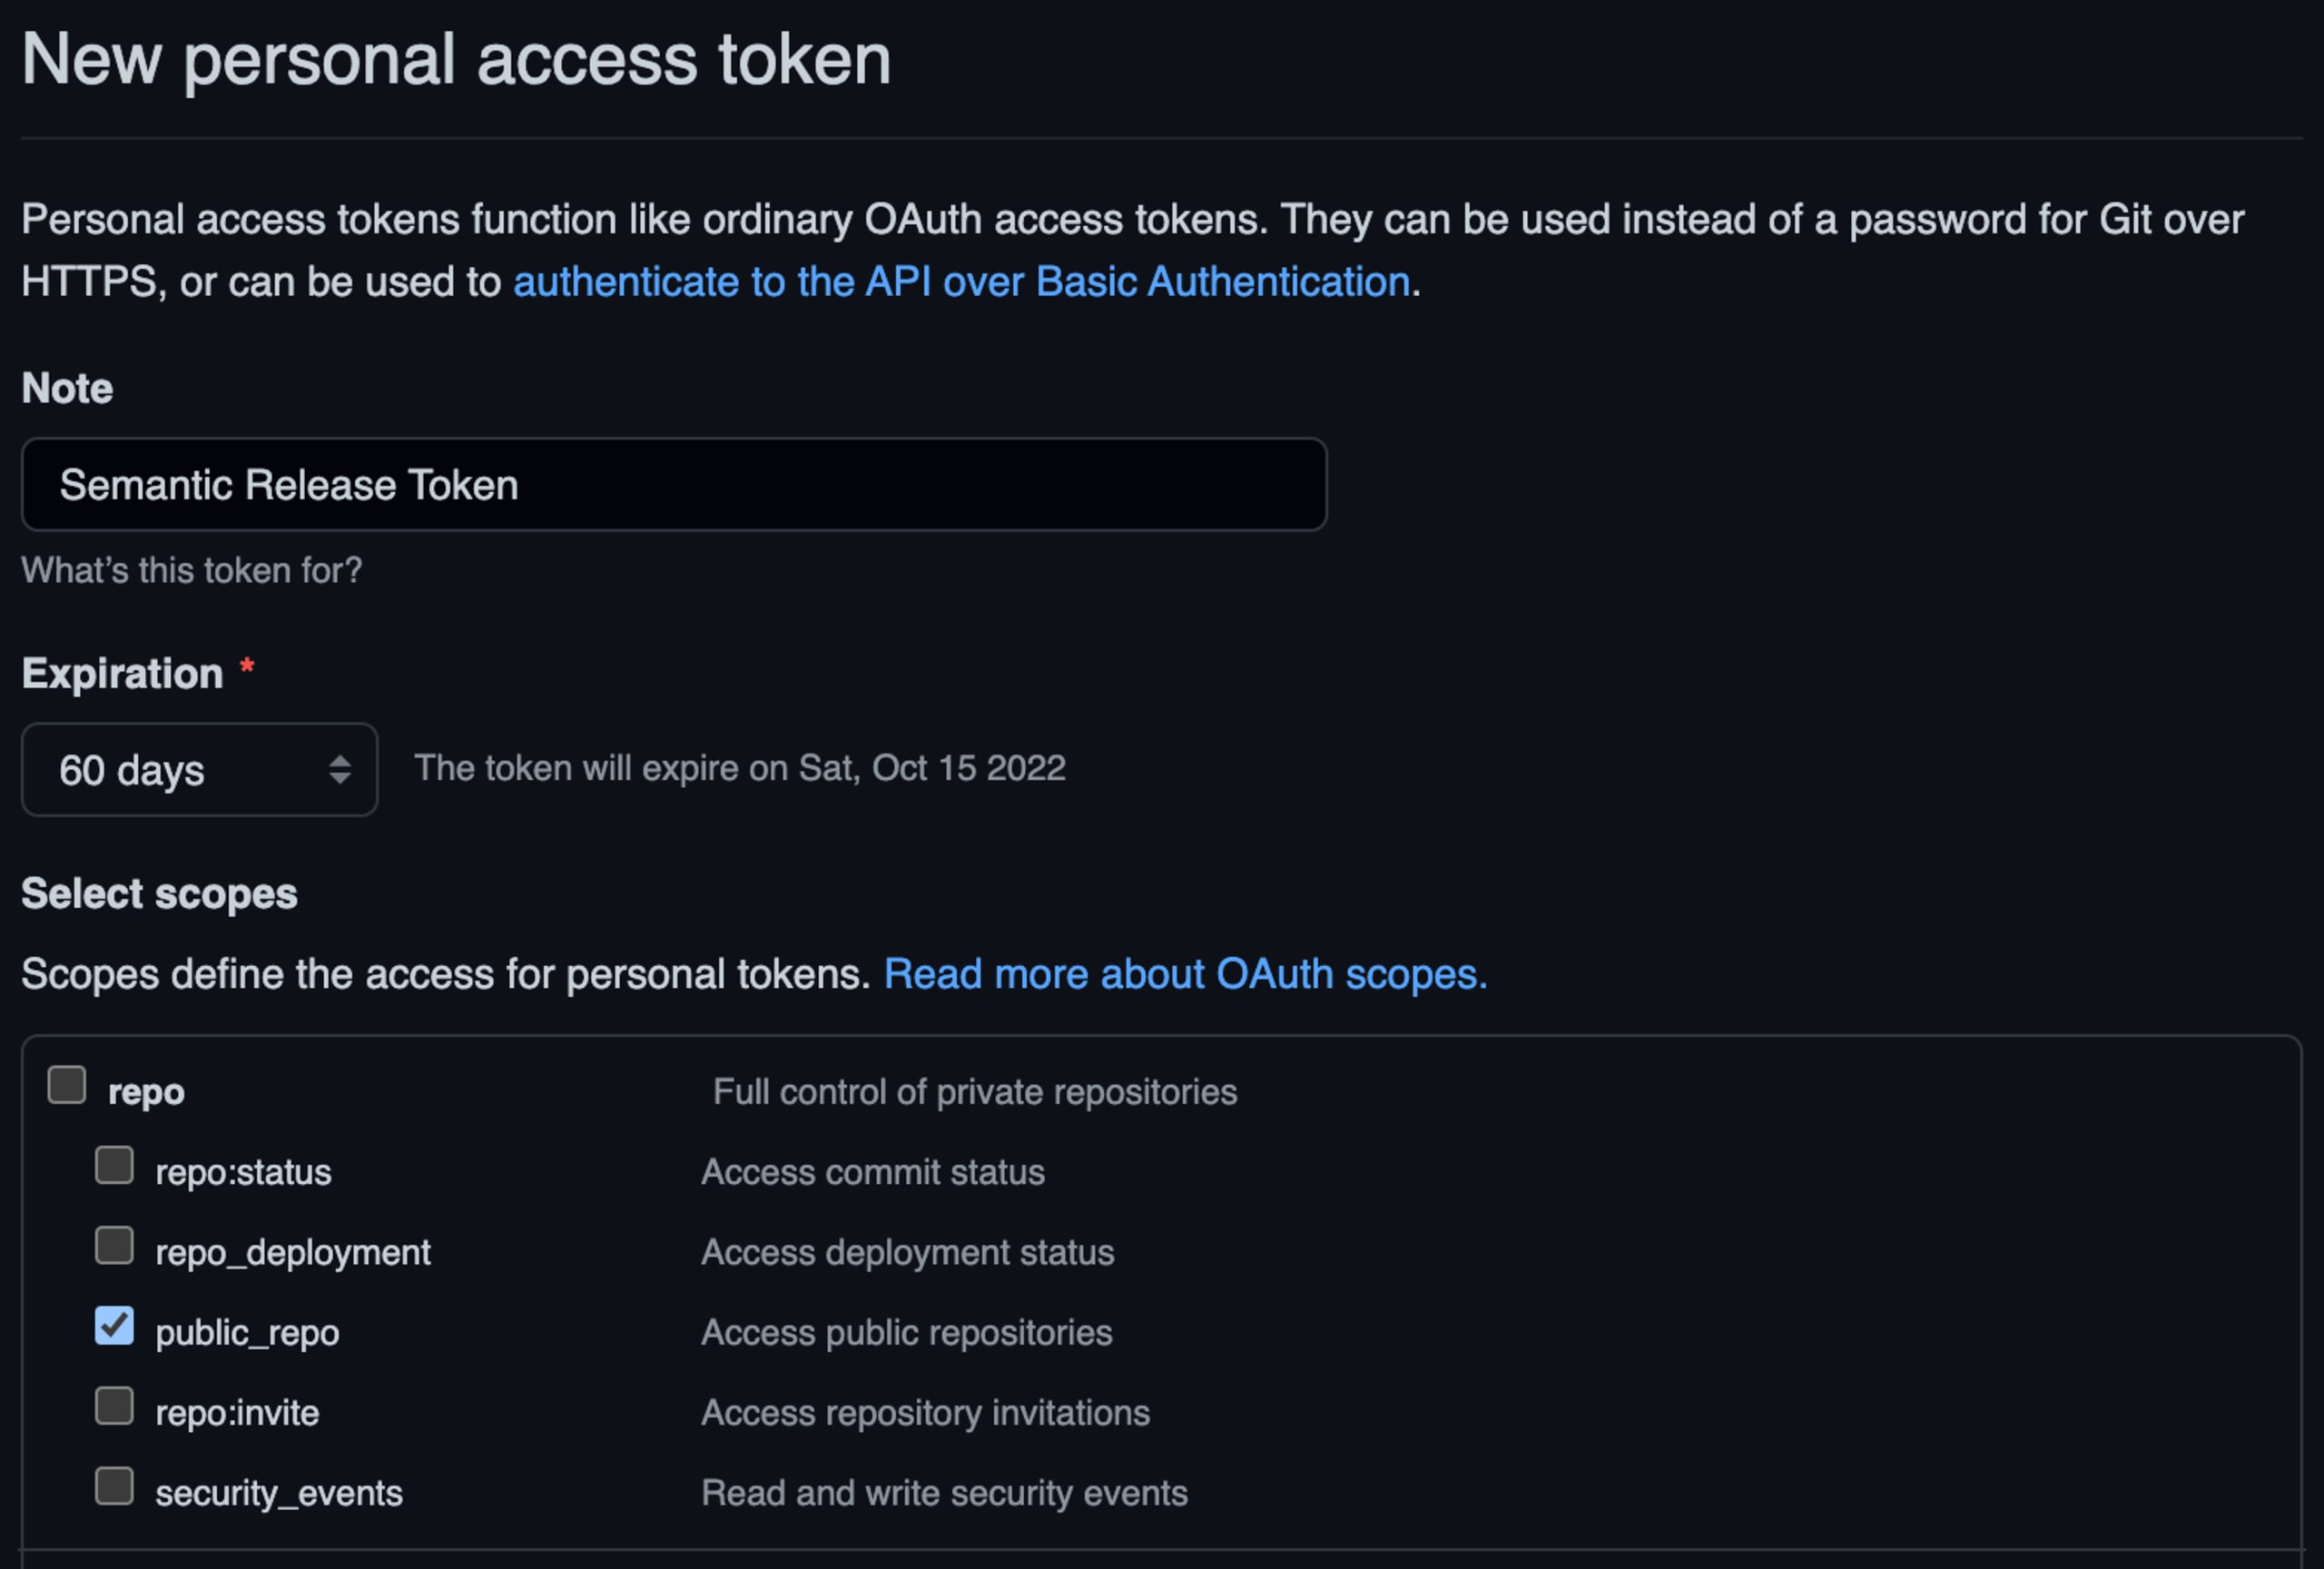
Click the “Generate token” button and copy and save the value that is shown on the page.
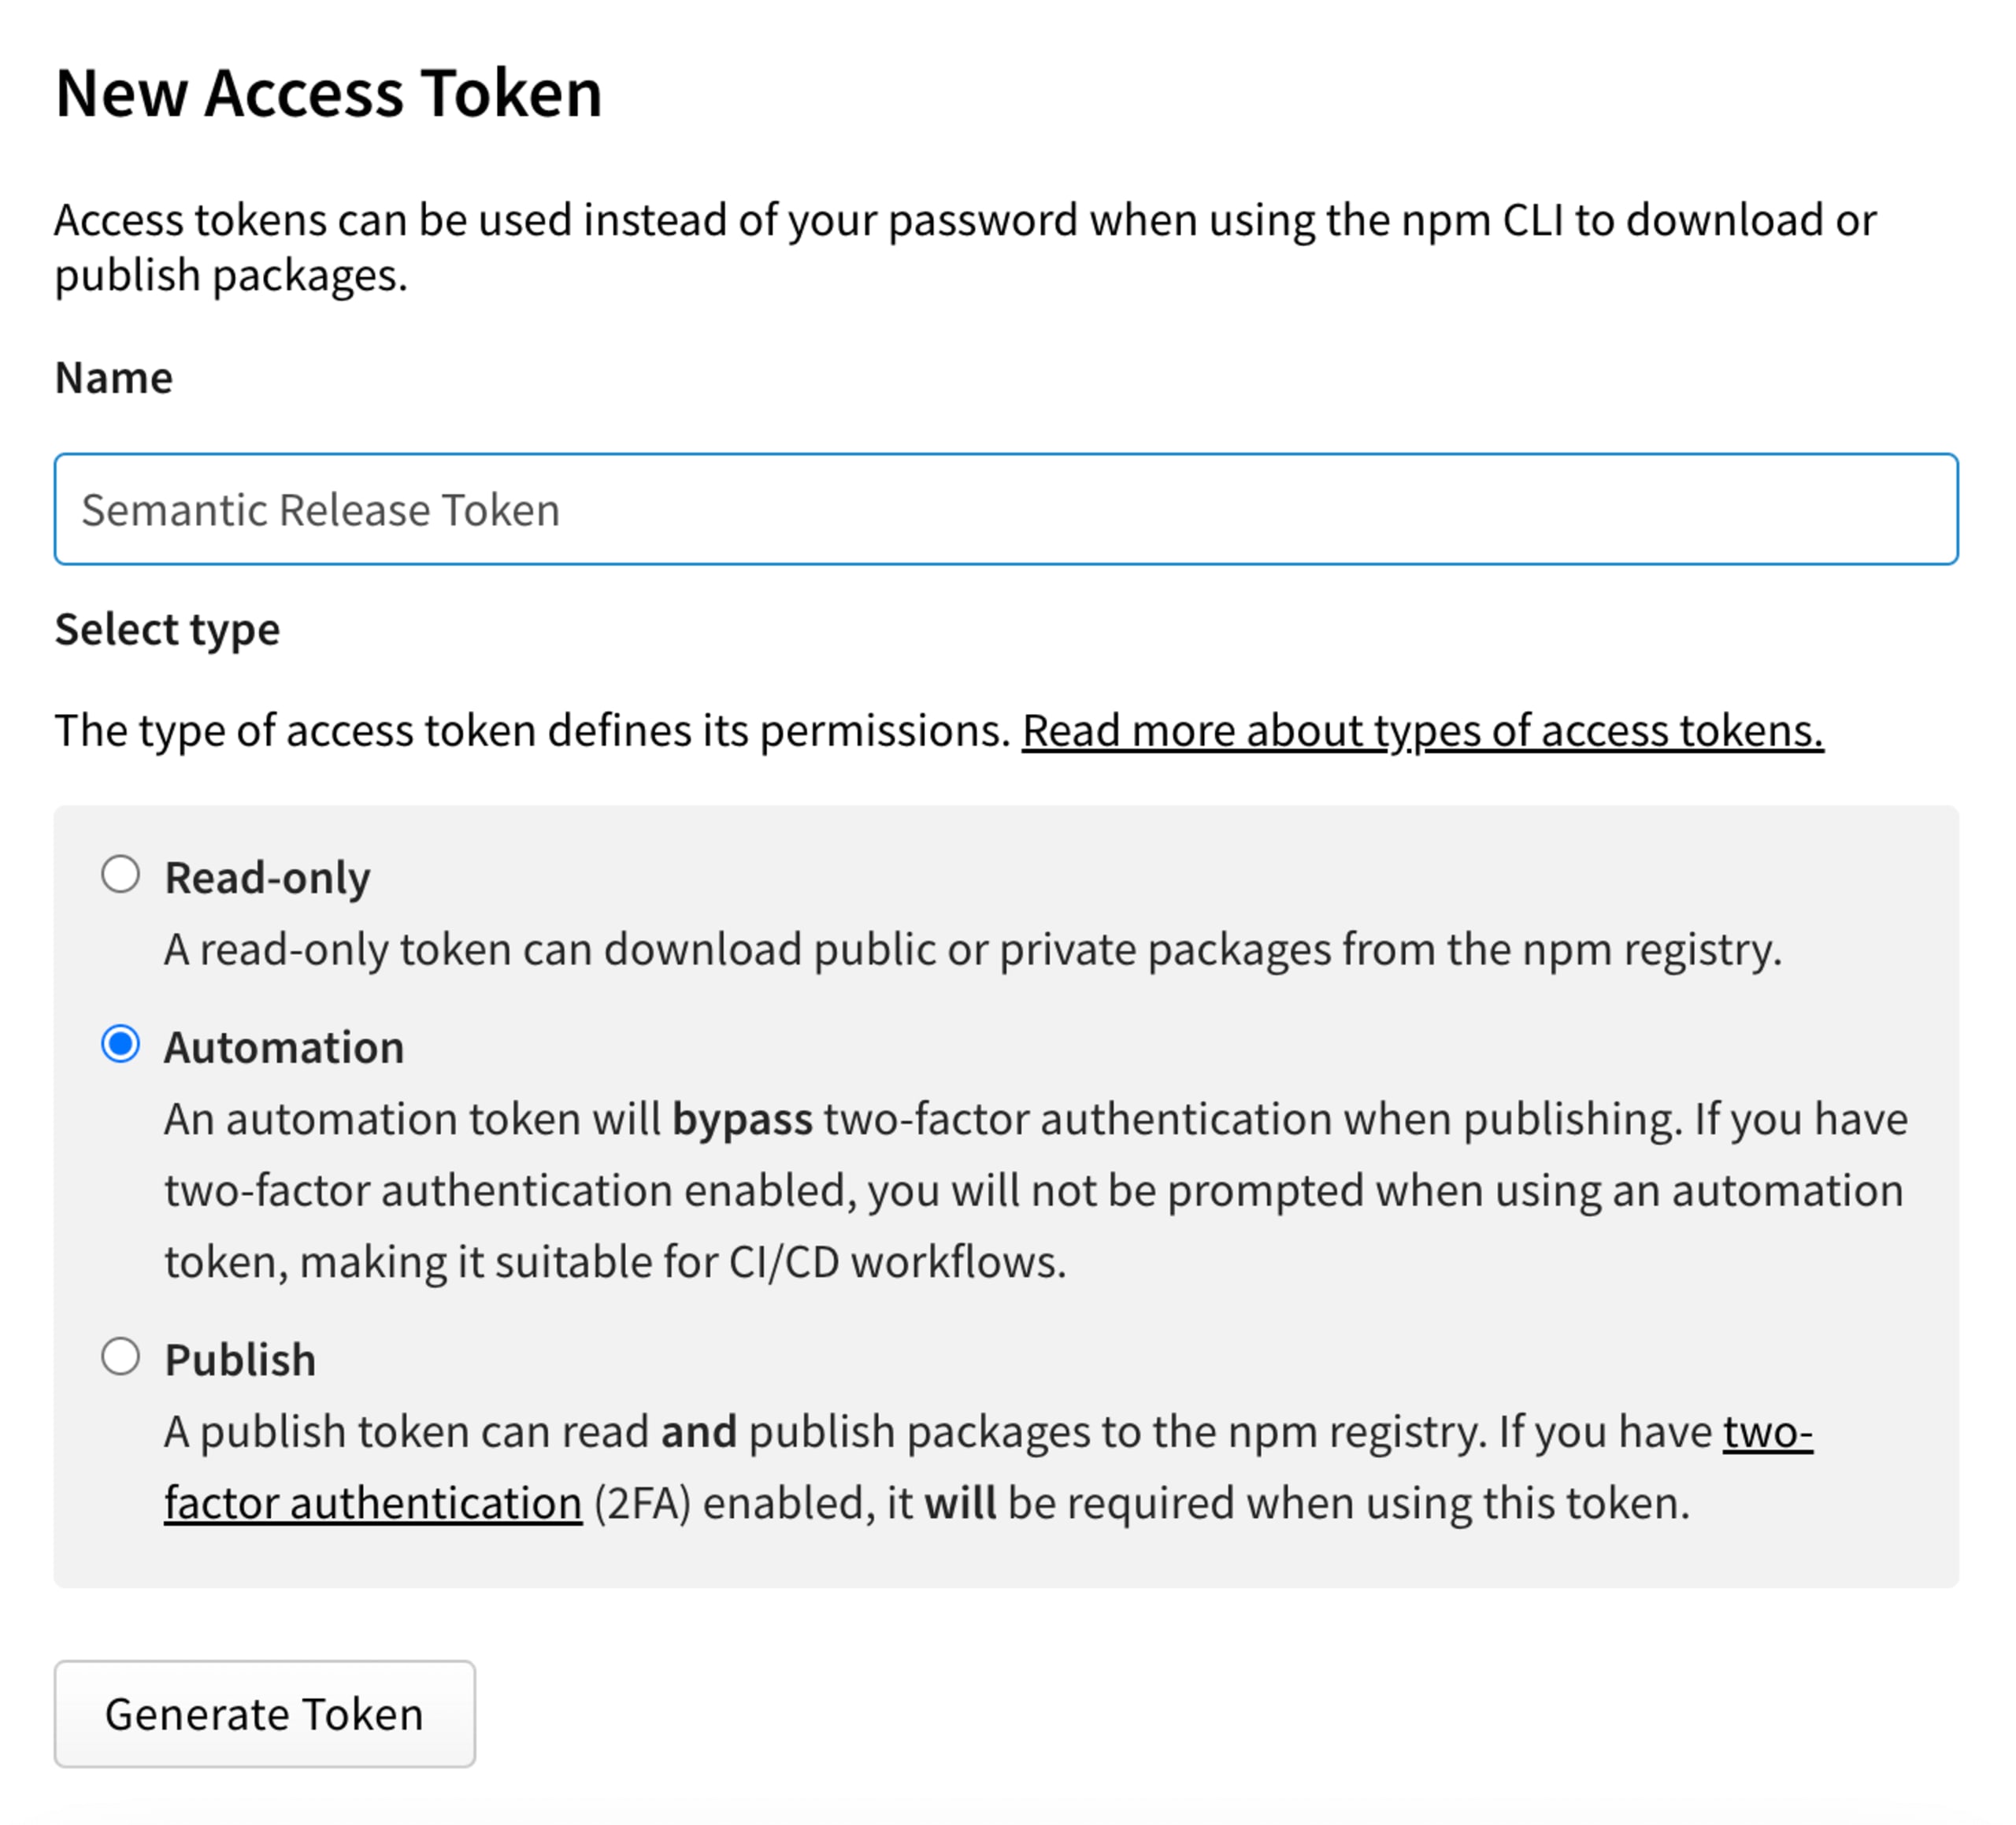
You’ll also need an Automation-type access token from npm to be used solely in CI environments so that it is able to work around your account’s 2FA. To create one, go to
https://www.npmjs.com/settings/<your-npm-account>/tokens. Be sure to select the type “Automation” as this will be used in a CI/CD workflow.
1bc@mbp-snyk modern-npm-package % npx semantic-release-cli setup
2? What is your npm registry? https://registry.npmjs.org/
3? What is vour nom username? clarkio
4? What is your pm password? [hidden]
5? What is your NPM two-factor authentication code? <2FA code>
6Provide a GitHub Personal Access Token (create a token at https://github.com/settings/tokens/new?scopes=repo
7<token>
8? What CI are you using? Github Actions
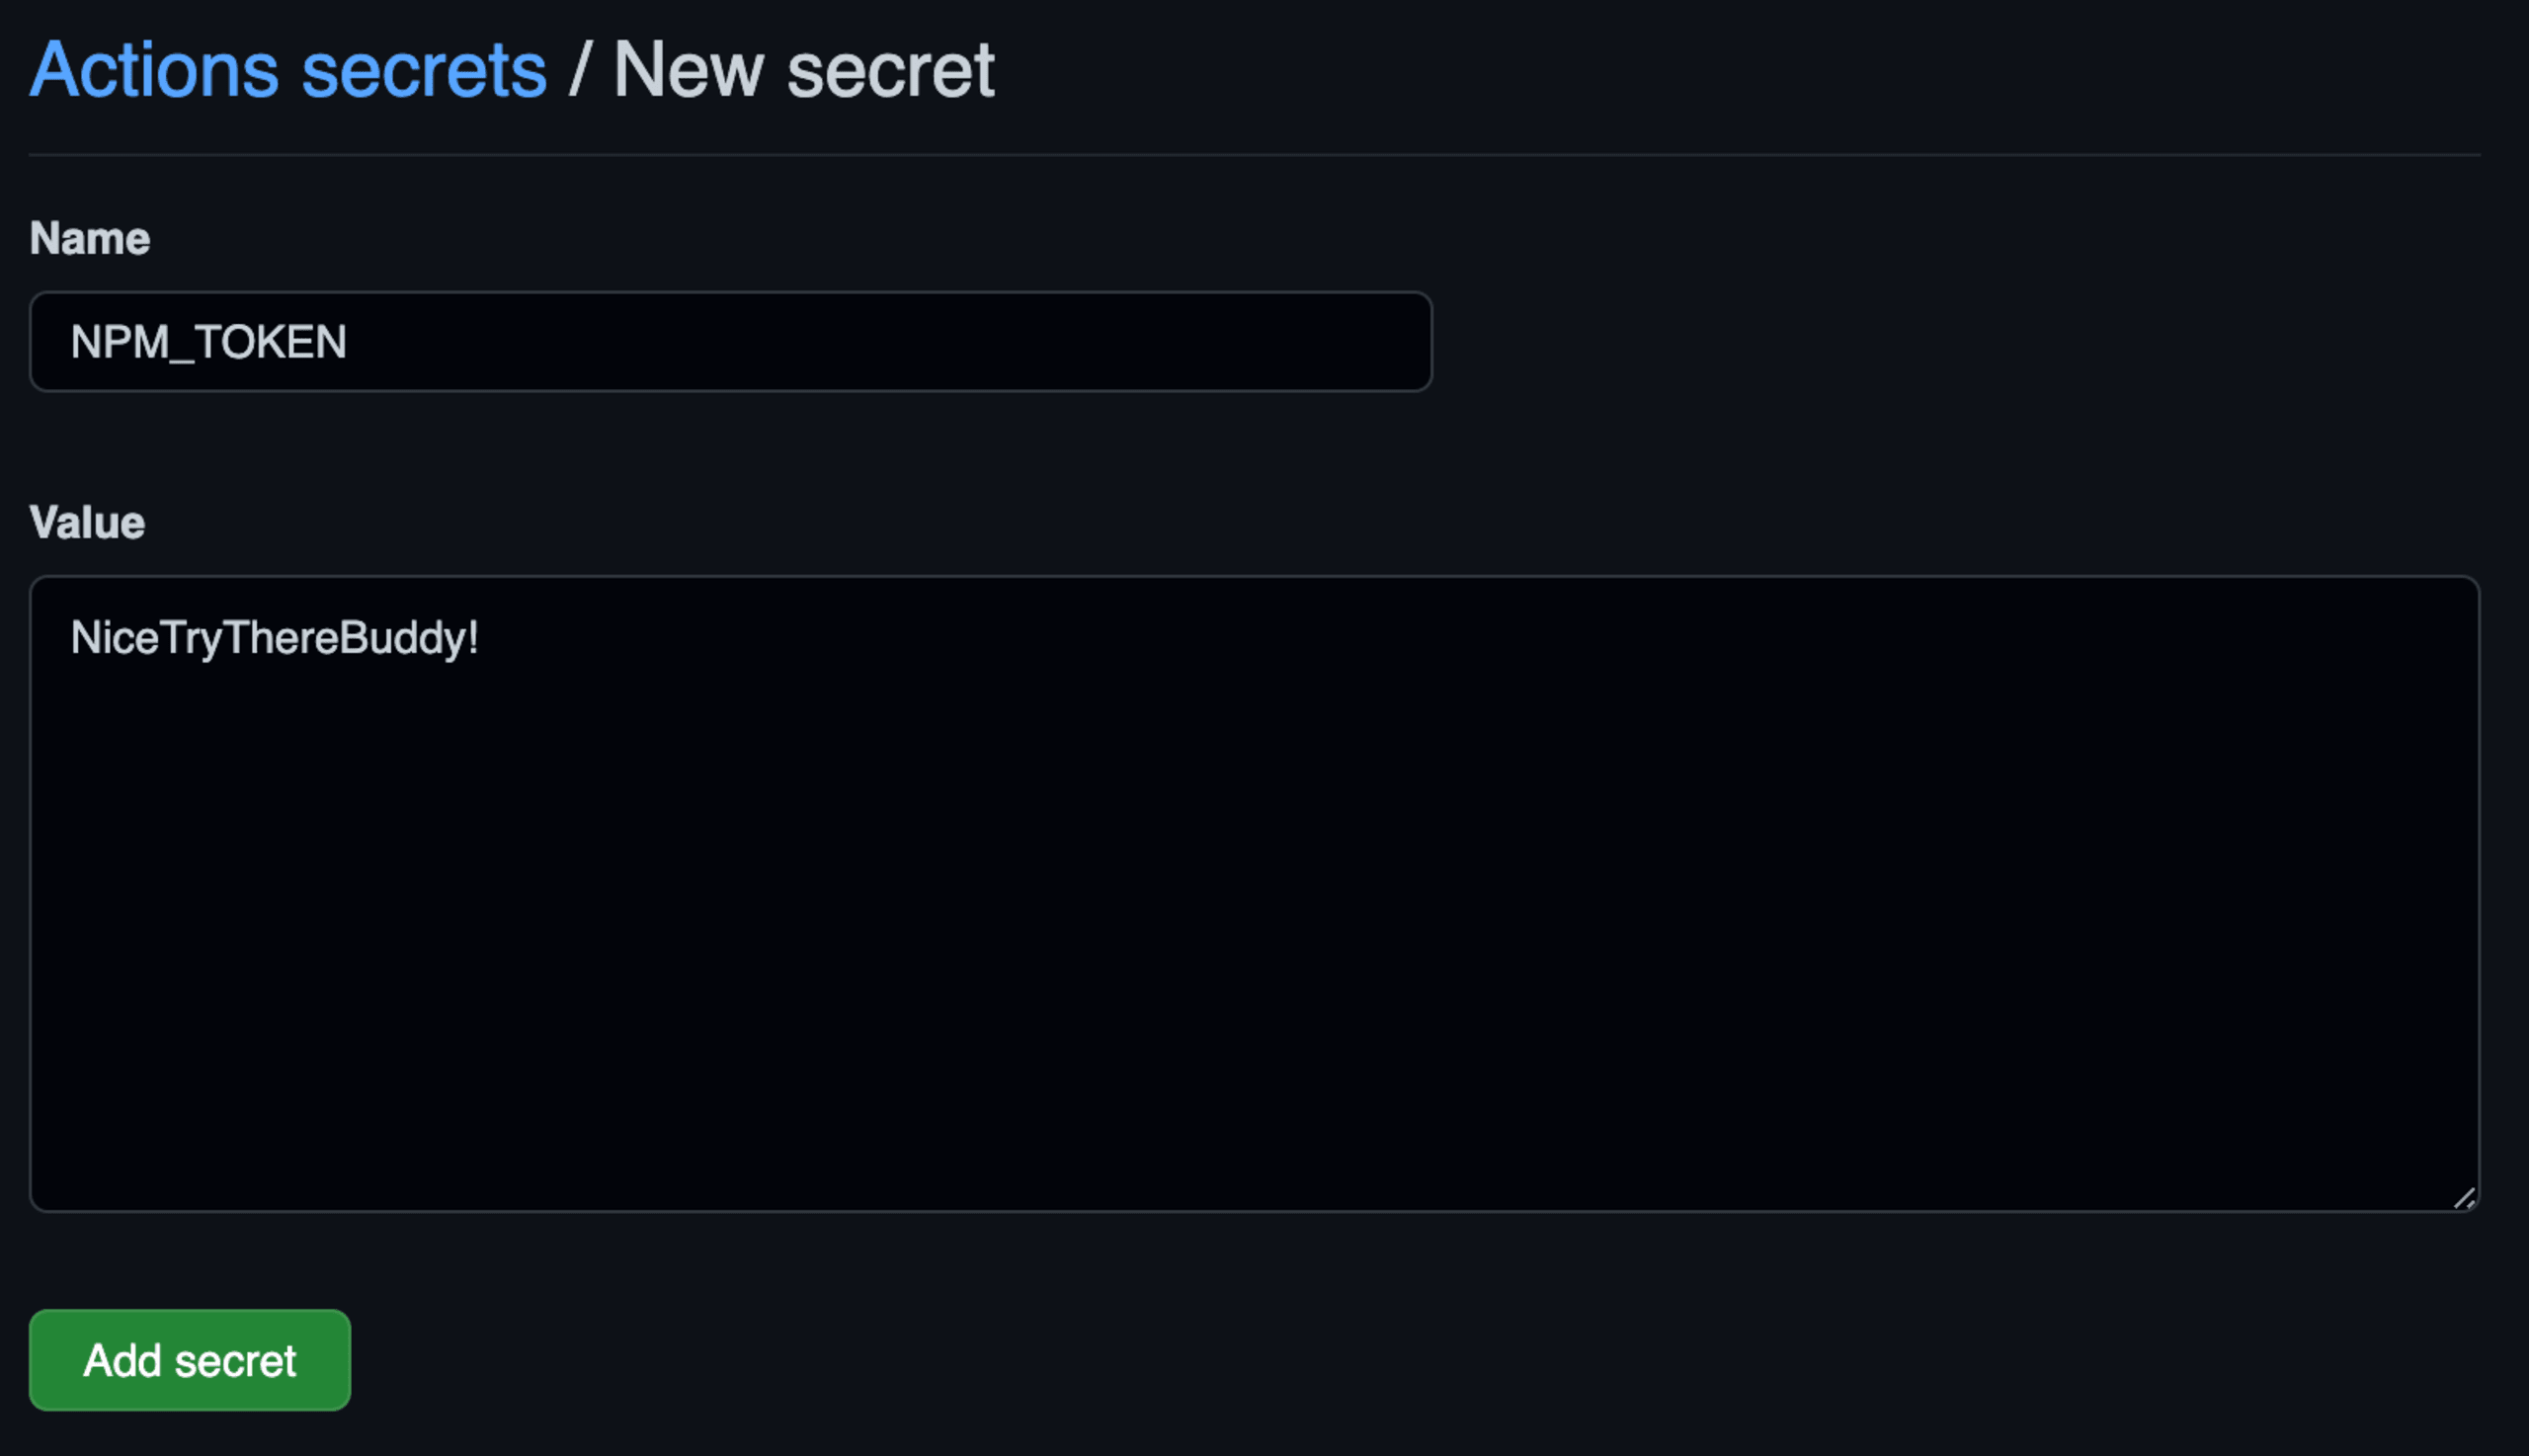
9bc@mbp-snyk modern-npm-package %4. Add your npm token to your GitHub repository as a repository secret here: https://github.com/<your-name-or-organization>/<your-repository>/settings/secrets/actions/new. Set the name of the secret as NPM_TOKEN with its value that you retrieved in an earlier step
5. Back in your project, go to your package.json file and add a releases key like below. If your repository’s primary branch is still called master and not main then update the above branches value accordingly.
1"release": {
2    "branches": ["main"]
3  }
6. Add a publishConfig key in your package.json file as well:
1"publishConfig": {
2    "access": "public"
3 }
7. Test everything out by doing a dry run using the semantic-release npm script. Take the following command and set the NPM_TOKEN= and GH_TOKEN= values to use your respective token values. Then copy and run the full command in your terminal to see if everything runs correctly. You’ll see the process logged to the output of your terminal. If any issues arise they’ll be visible here and offer details to resolve them.
8. After confirming the dry run completes successfully you can set up your GitHub repository with a new GitHub Action to handle the publishing process for you. Go to your repository on GitHub and click “Actions''
9. Click the New workflow option.
10. Rename the workflow to release.yml.
11. Add the below YAML script to the new workflow file. This script essentially says that once the Snyk Security Check work completes successfully, run the release job. The release job checks out the code, sets up a Node.js environment, installs your dependencies and then runs semantic release using your GitHub and npm tokens.
1name: Release
2on:
3  workflow_run:
4    workflows: ['Snyk Security Check', 'Tests']
5    branches: [main]
6    types:
7      - completed
8
9permissions:
10  contents: read
11
12jobs:
13  release:
14    name: Release
15    runs-on: ubuntu-latest
16    permissions:
17      contents: write # to be able to publish a GitHub release
18      issues: write # to be able to comment on released issues
19      pull-requests: write # to be able to comment on released pull requests
20      id-token: write
21    steps:
22      - name: Checkout
23        uses: actions/checkout@v4
24        with:
25          fetch-depth: 0
26      - name: Setup Node.js
27        uses: actions/setup-node@v4
28        with:
29          node-version: 'lts/*'
30      - name: Install dependencies
31        run: npm ci
32      - name: Verify the integrity of provenance attestations and registry signatures for installed dependencies
33        run: npm audit signatures
34      - name: Release
35        env:
36          GITHUB_TOKEN: ${{ secrets.GITHUB_TOKEN }}
37          NPM_TOKEN: ${{ secrets.NPM_TOKEN }}
38        run: npx semantic-release
This script essentially says that once the Snyk Security Check and Tests work completes successfully, run the release job. The release job checks out the code, sets up a Node.js environment, installs your dependencies and then runs semantic release using your GitHub and npm tokens.
Note: GitHub Actions has a GITHUB_TOKEN secret/environment variable built-in so no need to provide the personal access token in this environment. The PAT is just for local testing of your configuration of semantic-release
12. Commit your local changes and push them to your GitHub repository
You can do this by running the command
git commit -am '<your commit message>'in your terminal and thengit push.You can also do this in VS Code via its version control functionality.
13. With all of that set up, you can now use conventional commits to push changes to your main branch (or by merging pull requests) and the release workflow will run (after the Snyk Security Check of course). You can view an instance of that happening in the example modern-npm-package repository workflow.
Continuous security monitoring with Snyk via GitHub
While it’s beneficial to have security checks directly in the process where you commit your code there is potential to miss out on vulnerabilities that arise between commits. For instance, if you haven’t pushed any code to your repository in a few months you won’t know about any new vulnerabilities that were discovered in that time. This is where Snyk helps even more! When you connect your GitHub repository to Snyk, it will automatically monitor for new vulnerabilities and alert you to them regardless of how often you’re coding on the project. In addition to that, it will provide automated pull requests to address the security issues for you.
There are two products from Snyk which are particularly helpful for ensuring the security of your npm package code and its dependencies. Snyk Code assists with the security of your package code and Snyk Open Source monitors your open source dependencies for vulnerabilities.
To get started taking full advantage of your free Snyk account, follow the steps below:
1. Sign into your free Snyk account
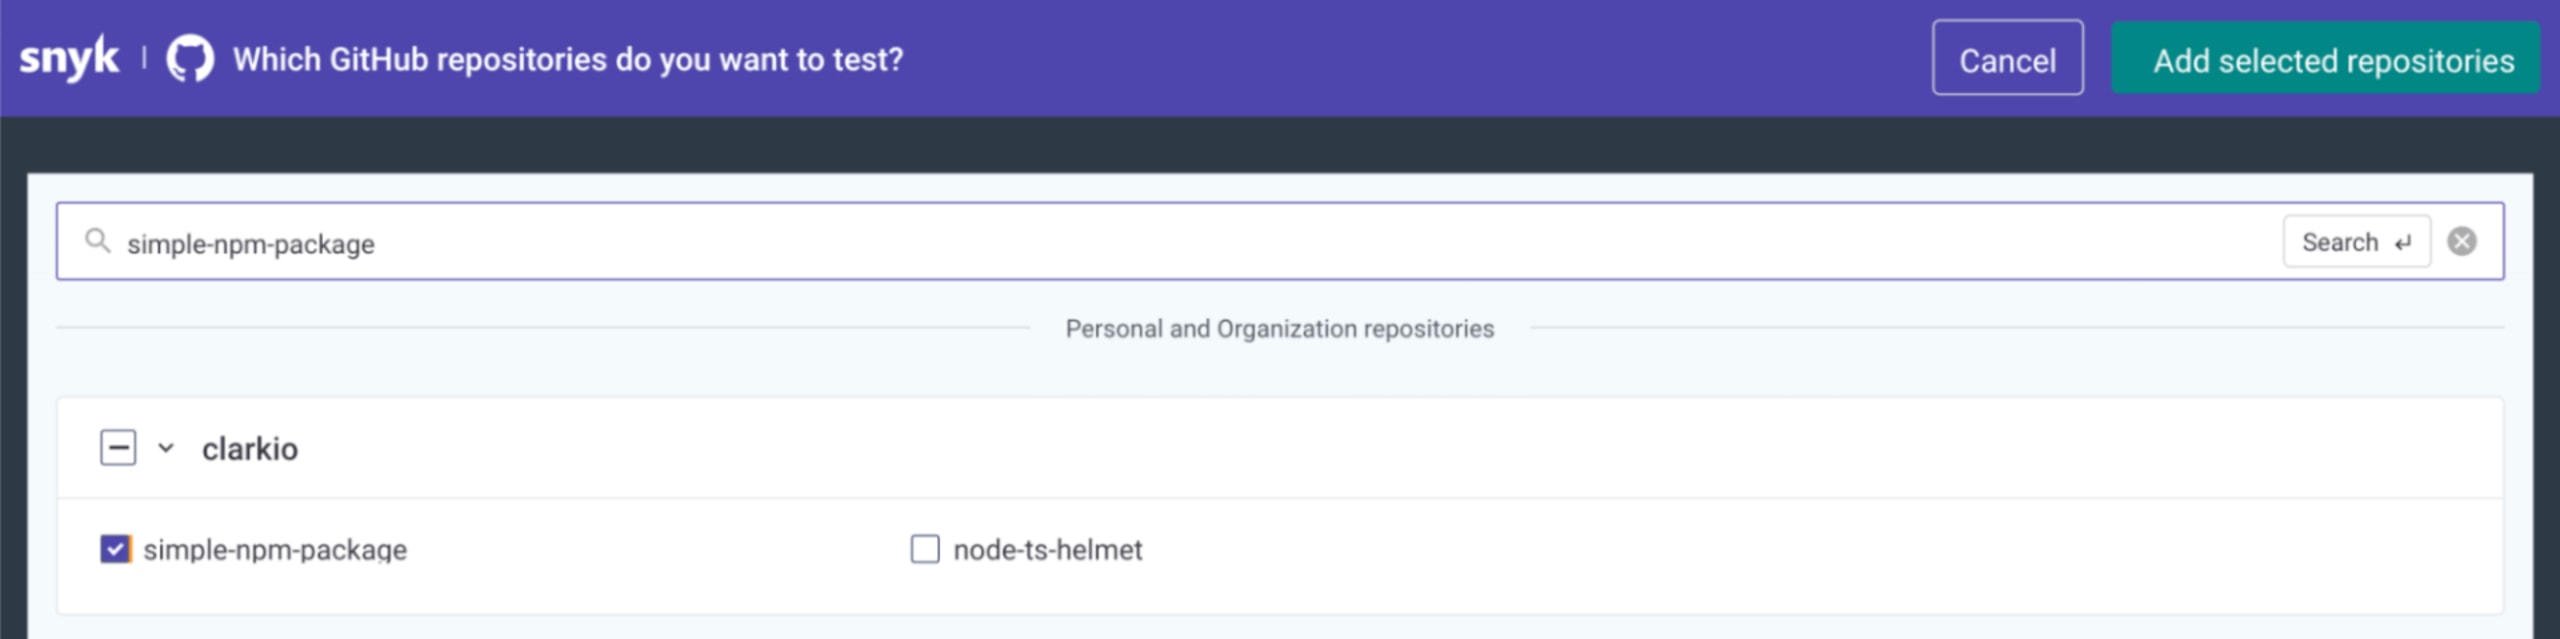
2. Choose Add project and then GitHub.
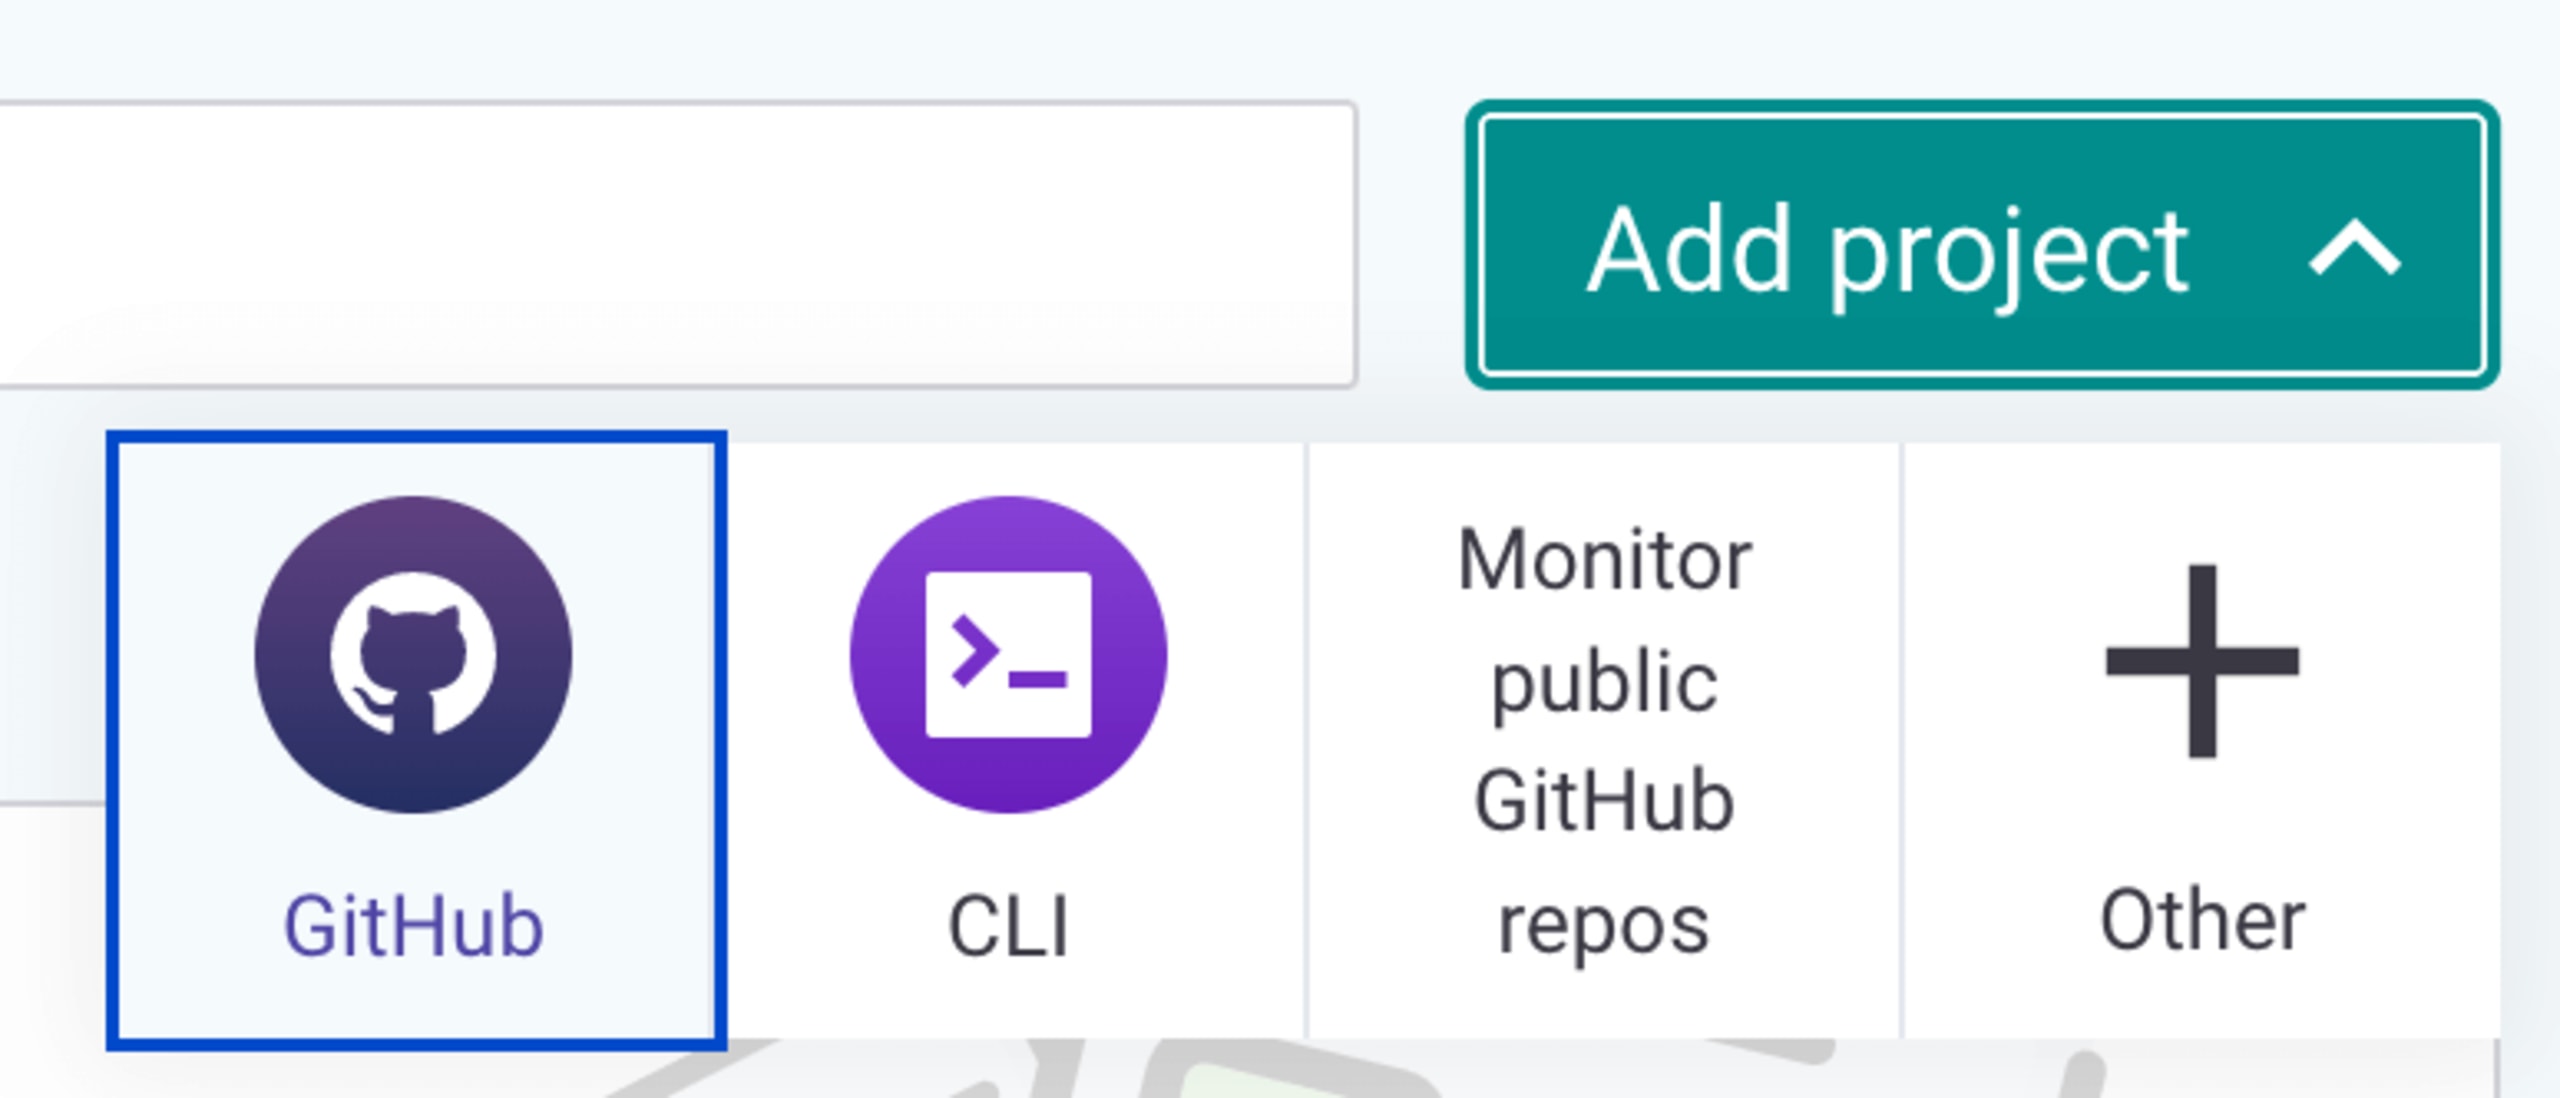
3. Search for your project’s repository by name and select the checkbox next to it.
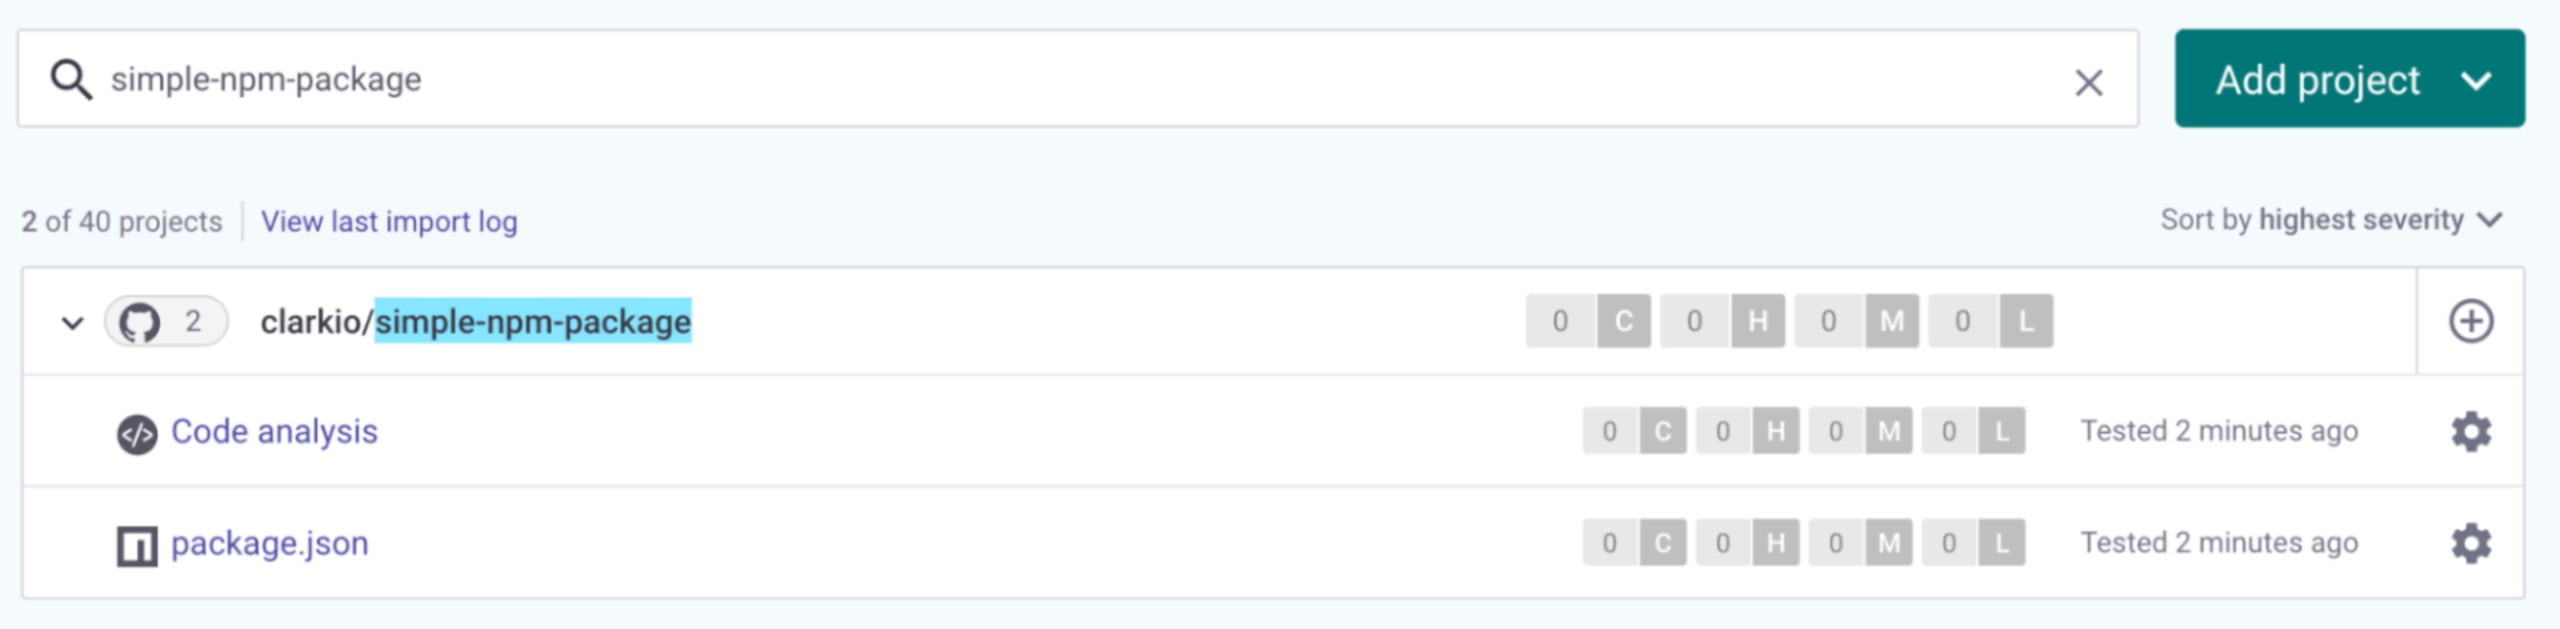
4. Confirm the repository has been successfully imported into Snyk.
Start creating modern npm packages
Let’s summarize everything you learned in this article. First, you became acquainted with setting up, creating and deploying a simple npm package. This was great to get familiar with what it takes to publish your own npm package for the first time. However, it’s quite manual and unsustainable to proceed in this way if you wish to make an npm package for production use.
In order to accomplish making a production-ready package, you then learned how to build for both CommonJS (CJS) and ECMAScript (ESM) module formats, set up and write unit tests, implement security checks and automate version management and publishing. With this knowledge, you’re now ready to make many more npm packages of your own that’s easily consumable by the community or your company.
Try Snyk’s free JavaScript code checker to find and fix vulnerabilities in your code.
Get started in capture the flag
Learn how to solve capture the flag challenges by watching our virtual 101 workshop on demand.